Project Maiko: Understanding Cycles Toon Shaders
/This is part 1 of the Project Maiko shader guide.
Part 2: The Maiko Shader Group
Most Blender Non-Photorealism and toon effects are done in the Blender Internal render engine. This is for several reasons, among which are speed, simplicity of flat tones, and Freestyle. Cycles is more focused on realism than NPR, and lacks some of the nice tools Blender Internal has. But I chose early on to learn it instead. I was attracted to its more accurate handling of light—allowing me to use more of my photography experience—and more powerful node system. The merits of both engines are debated extensively. But regardless of your thoughts and feelings on each, what is certain is that Cycles is not as well covered in guides and documentation, especially when it comes to NPR.
The node setup I used for Maiko is not complex by Cycles standards, but I am going to start at the beginning for the benefit of those not familiar with Cycles shaders (specifically Diffuse, Glossy, and Toon versions of each). This first post will explain the nodes and lights I am working with so that those with minimal prior experience will be able to understand the full setup. The Maiko shader nodes will be covered in the second post.
This guide assumes basic knowledge of Blender 2.69's tools and interface, specifically the Cycles Node editor and materials panel. Shaders involve a lot of optics and math that I don't fully understand, so I'm sticking to simple explanations. We don't need to understand all the technicalities to use them artistically.
What are Diffuse and Glossy shaders?

The core of almost every Cycles material.
Almost every material is created from mixing Diffuse and Glossy shaders. For those of you familiar with Blender Internal, in Cycles this is analogous to your basic material node's color and specular inputs. If you've done even just basic material tutorials, then you've probably learned that Diffuse = not shiny, and Glossy = shiny. This is true in most cases, but is an oversimplification.
Shaders tell light how to interact with a surface. Diffuse and Glossy describe two different types of light reflection when interacting with the micro surface of an object using different mathematical formulas. In simple terms, Diffuse surfaces cause incoming light to bounce around within the material and reflect back out at a variety of angles, usually dispersing it. Glossy surfaces reflect incoming light off their surface at a single angle. If you want the full technical explanation, start with Wikipedia: Diffuse Reflection, Specular Reflection.
In reality, almost every material will have both Diffuse and Glossy reflections (there are some exceptions, like very smooth polished metal.) Which we are able to observe changes based on angle. When we are viewing from direct angles, more of the Diffuse reflections will be visible. At grazing angles, we will see more of the Glossy reflections. The angles needed for the different interactions, and the amounts of each, vary depending on the material.
The point to take from this is that whether an object should be more Diffuse or more Glossy is a fundamental property of its real material, not simply a matter of how shiny you want it to look.
Toon Shaders
Cycles has toon versions of Diffuse and Glossy. These nodes have mostly the same settings, but with some notable differences. These are most easily shown, so here's a lot of spheres with different settings. The test scene is a default UV Sphere with 4 levels of Subsurf, large floor plane with white Diffuse material at 0 roughness, point light with size .1 and strength 500, and no light bounces at 500 samples.

Both give us a gradient from light to dark based on the direction from which light hits the object. The Roughness field of the regular Diffuse controls the amount of diffusion when light hits, simulating a rougher micro surface. Turning it up effectively softens the gradient, but does not change the position of the terminator (the line at the edge of light and shadow).
Toon Diffuse has a Smooth field, which is mathematically different from Roughness (as Toon shaders do not actually provide realistic light dispersion) but has the same artistic effect of softening. More important is its size field. At 0 Smooth, the toon node is giving us a hard edge between light and dark instead of a gradient, providing a two-tone effect. The size determines where the edge is, so it effectively controls the terminator. If you also have Smooth, it spreads the edge into a softer gradient, but still never gets as soft as a regular Diffuse.
Note that toon sizes of 0 or 1 give pure black or pure white respectively, and going too close to either (say, .01 or .99) can cause glitches.
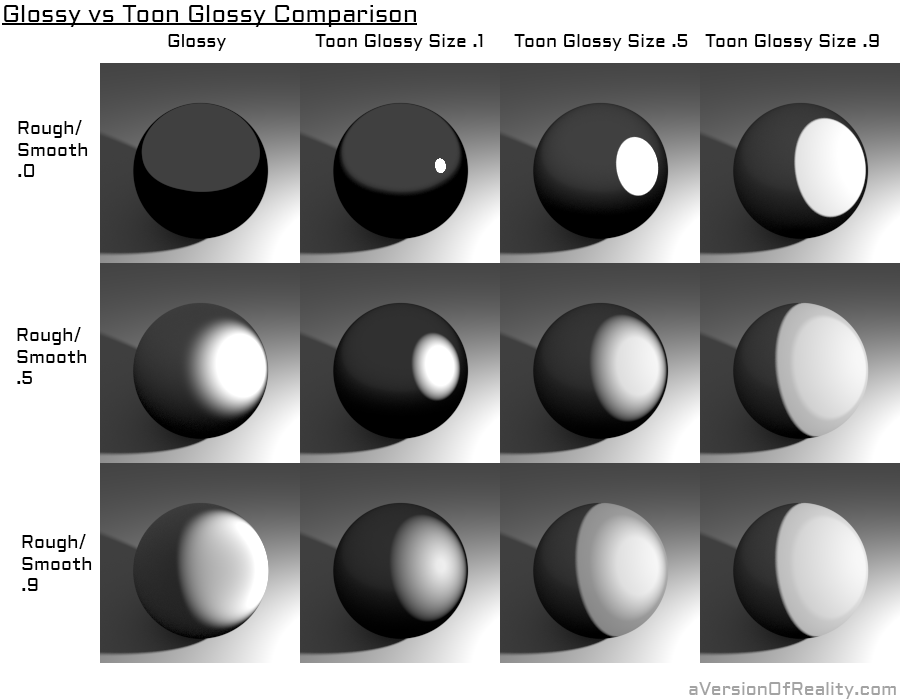
Gloss is doing much the same thing, but at different angles as it is reflecting differently. Note that at 0 Roughness/Smooth, Gloss is fully reflective. It looks dark because it is reflecting the dark gray of the default Cycles world environment.
Mixing the Shaders

For this example, 0.5 mix factor was used rather than 0.1 or lower so that the effect would be clearly visible.
Now that we know what our nodes are doing, how do we combine them? What you put into your Mix Shader node's factor is very important. This is another area that basic tutorials often gloss over. Many will advise using a low mix factor, such as 0.1 or 0.01. You can spend ages trying different mix factors, but sadly you will never get it right. This is because no matter what number you put, it will cause an equally distributed amount of mixing across your object. But real light doesn't work that way due to Fresnel.

This shows the Fresnel distribution (IOR 1.450.) Areas facing away will get more Gloss.
Fresnel is another complicated optical effect that is technically far beyond my understanding. The simple explanation is that at a low enough view angle, everything becomes a mirror. Fresnel is why if you look at a puddle of water from above, it is transparent, but if you put your head down close to the ground, it becomes reflective. It is also easily observable on flat surfaces like desks and tables. Earlier I mentioned that we see different reflections based on the angle we are viewing the object at. Fresnel is what gives us this effect.
Everything has Fresnel, but not in the same amount. The amount is determined by the object's Index of Refraction. Lists of IORs are easy to look up on Google or Wikipedia. Plug a Fresnel node into your mix factor, look up an appropriate IOR for your material, and that's it for most materials.
Since we are doing non-photorealism, it is not strictly necessary to use Fresnel. There are no hard rules when it comes to NPR. But I have found using it looks far better than a flat factor, and saves a lot of time trying to find an appropriate mix factor.

If you want to learn more about Fresnel, I recommend this article: Everything has Fresnel
Lights and Bounces
Blender Internal only has access to regular Lamps, but in Cycles we can give any object an Emission shader, turning it into a light. This allows us to do large soft lights like you would see in a photography studio (regular Lamp size works differently, and cannot create realistic large lights in the same way).
Light size directly effects the hardness of shadows. Small lights make hard edges, large lights make soft gradients. This combines with the effects we already get from toon shaders. A small enough light can make a regular diffuse nearly look like a toon, and large mesh lights will soften toons.
Another factor is Light Bounces, which are a huge part of what makes Cycles different from Blender Internal. Light bounces will not change the hard edge of your toon, but they will cause light to bounce onto other areas of the mesh, softening areas of the shadows.
Conclusion
We now know the difference between a Diffuse and Glossy shader, how the Toon variants compare, how to mix them together, and what different light types will do. The shader I used for Maiko combines all of the above.
Next: The Maiko Shader node group.