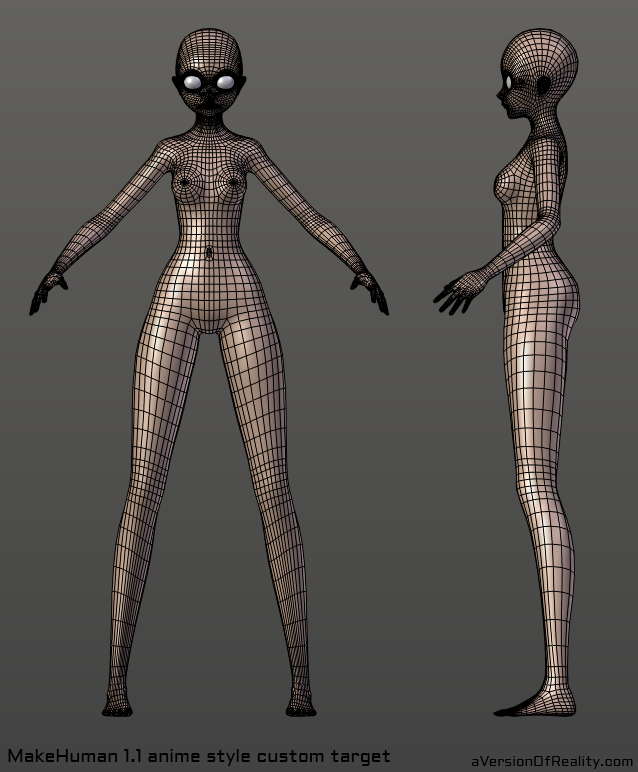
MakeHuman 1.1 Anime Style Custom Target Test
/
UPDATE: This project is no longer being worked on. The excellent Manuel Bastioni has made a new character creator that makes it redundant. Check it out here.
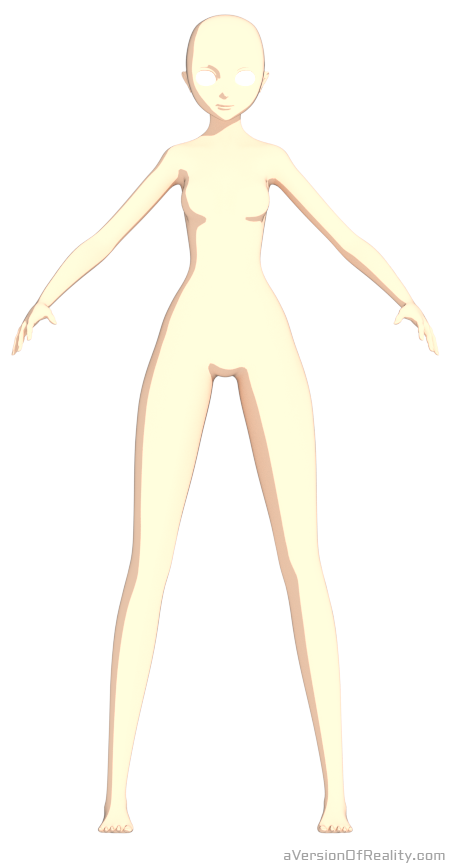
This is a custom morph target for the MakeHuman character generation program. MakeHuman normally creates realistic human bodies. This target morphs the base body into an anime style female character, with proportions based on MikuMikuDance (MMD). The purpose is to allow the quick generation of rigged anime style characters.
Get it off my Dropbox here.
This is an unfinished, unpolished test version. I am releasing this so that I can start to gather feedback. Please see the following notes to understand how to use the target, and what the current issues and limitations are. It's long, but I wanted to give enough info for people who hadn't worked with custom targets before to be able to understand what's going on.
How to use:
To use the target, place the .target file in User/MyDocuments/makehuman/v1/data/custom, or equivalent if you aren't on windows. It will then show up under the Custom tab in MakeHuman. Set the target slider all the way, or you will have a very strange body.
This target should be used with MakeHuman 1.1, which is the current unstable nightly build. Get it here. It is possible to use it with 1.0, but you will not get good results from the rig. This is because this target changes the body significantly enough that it would need different weights. 1.1 has a new, improved rig. It has some issues (noted below), but works for the most part.
Cycles Toon Shaders + Sun Lamp
Please note that in 1.1, you must select a rig from the Pose/Animate tab or you will get only the mesh when you export. Use the Default skeleton. I recommend using COLLADA (.dae) export. Unlike .mhx in 1.0, it does not include rig setup tools such as IK/FK switch. This makes it is less convenient as you will have to do your own setup if you want an IK rig at this point. It would be more user friendly to make this for 1.0 at the moment, but 1.1 will be released soon and has a much better rig. The more advanced rig setup tools will come in time. I will probably make a 1.0 version once I solve the custom proxy weights issue (see below.)
Due to how MakeHuman targets interpolate, some targets work better than others. I have not tested them all, but in general I suggest avoiding any target in the Main tab except Height and Weight. Targets that adjust small details of the face can also cause issues. Targets under the Measure tab all seem to work fine. So you can easily adjust limb length, height, etc. But if you need to make detailed changes to the face, I suggest doing it in Blender.
At this time, I have not added any anime style eyes, teeth, hair, or other accessories to MakeHuman. You can use existing ones, but they will be badly stretched. I suggest making your own eyes in Blender. Simply center a sphere on the eye bone's root and scale to fit the socket. 3D anime models often use flat style eyes. Those may be added in the future, but as MakeHuman is based around spherical eyes, that is what the target is currently designed for. Eyes, teeth, and tongue models compatible with this target will be added later.
There is no additional license for this beyond the standard MakeHuman license, so there are basically no restrictions. You don't even have to give me any credit, but I hope you still will.
MakeHuman Considerations
You can find the MakeHuman documentation on their wiki. This project has used the MakeTarget and MakeClothes addons. Here is a summary of how the relevant parts of MakeHuman work.
Topology
MakeHuman morphs work like Shapekeys in Blender. Each target is the same vertices, but in different positions. This means that every target has to have exactly the same number of vertices, and the same vertex indices. You cannot add or remove any vertices! However, the amount of points you need in any given area for a realistic person and for an anime character are different. To some extent, you can move things around. But points need to stay in roughly the same area due to how weights are generated. And in some cases, they need to be in exactly the same places (for example, whatever point is at the furthest corner of the mouth needs to stay there). The end result is that there are too many edge loops in several areas, especially the face. Once you have imported your model into Blender, feel free to remove vertices or whole loops as needed, but be conscious of how this affects the rigging.
Weights
Weights are generated based on vertex index. This means that if you have a vertex that is in the knee, and in a custom target you move it to be further up the leg in the thigh, it still gets weighted to the knee bone and you get bad deforms. There are currently some small weight problems in areas where anime proportions differ from regular human proportions by a large amount. Most notably the eyelids. But for the most part, the default weights work well. Targets do not affect weights. If you want custom weights, it is technically possible with a proxy topology, but I haven't gotten it working yet.
The Rig
The positions of bones in the rig are generated based on helper geometry, and on some vertex indices (most notably in the face rig.) This helper geometry is part of the target and is affected by it. I have tried to place all of this helper geometry in the correct place, but some bones may not be in the optimal position. You can see the helper geometry if you export with Helper Geometry checked, or load a body or target through the MakeTarget or MakeClothes addon. If an area is not working well, you can try moving the bones by going into edit mode on the rig.
Proxy Topologies
A proxy topology is an extra, additional topology that is vertex mapped to the base mesh. It can have entirely different vertex amounts and indices. Any vertices that are in the same place as the base mesh will follow them. Any that are not will be mapped to/interpolated between other nearby verts. The proxy's verts then inherit their weights from the base verts they are mapped to. The mapping is done by the MakeClothes addon and stored in a separate file from the mesh object which tells MakeHuman how to handle it. This file can be modified to ignore the base mesh's weights and instead take weights from an exported file of another mesh's weights. At this time, this isn't all working due to what I think are issues with the weight exporter. Once I get it working, I will be able to make a proxy with weight fixes and optimizations for anime proportions. In the mean time, you will need to make fixes yourself. I also hope to make a proxy with more optimized topology. Proxies are time consuming to make as they must be all quads.
Feedback I'm looking For
I am open to any sorts of feedback, but here's what I specifically need help with on the technical side. You can leave a comment here, message me on facebook, or email me at aversionofreality at gmail dot com. Pictures/references or .blend files may help.
Weights
As mentioned above, there are some problems. I already have versions of the topology where I've fixed most of them (I think.) But I don't know if I've gotten them all. Please keep in mind that even with normal proportions, the MakeHuman rigging and weighting isn't perfect. This is because lots of things the human body does cannot be made correctly without using lots of corrective bones or shapekeys, which the rig does not currently include. I am not looking for feedback on weighting for the 1.0 rig at this time.
Bone Placement
As noted above, I'm not 100% sure that some of the bone heads are in their optimal position. If you find better positions, please let me know.
Unusable Targets
Also mentioned above, some of MakeHuman's targets just won't work very well with this target. This is because of how shapekey/morph interpolation works. All the other targets are for normal human proportions, and pull the model back towards them. Trying to make them all work perfectly would require building a whole new target library, which I'm not going to do. It also shouldn't be particularly necessary. Most anime characters of this style are differentiated by their outfits and hair. Their bodies look basically the same, and vary mainly in limb length and height, which work fine, and maybe subtle changes to the face. However, if there is a target that you think would be very good to have, and is not currently working, let me know and I'll see about making a custom version that will work.
Other Custom Targets
There are many styles within anime. This target is specifically aiming at the sort of proportions seen in MikuMikuDance. Targets for other anime styles are beyond the scope of this project. But I am considering making some targets for small tweaks, such as nose and chin pointiness, eye shape, etc. Ideally, these should be the sorts of things that can't just be done simply in Blender, but that can still be accomplished without holding up the rest of the project. Let me know if there's anything you really want to see.
Proportion Problems
This model was based on a variety of reference MMD models, tons of different 2D references, and then lots of tweaks and changes as I used it for previous projects. It's not perfect. If you spot areas that need work, let me know. But please keep in mind that lots of anime style proportions look fairly alien on their own. For example, the torso may seem very small compared to the legs. But once you add clothing, it works a lot better. The face looks especially strange without hair, eyebrows, etc. And if you use hair that isn't the proper style, size, or aspect ratio, it'll look whacky. It's difficult to sort out actual problems with the base body from issues with the rest of the character. Also, I know that it currently doesn't have lots of details like collar bones. Those are being worked on.
Areas with Bad Shading when used with Toon Shaders

Cheek toon shadow terminator
There are certain shading conventions in anime art. If your model produces shading that looks too different, then it won't look right. The biggest part of this is when you have wiggly terminators on toon shadows. The easiest example is the shading you see down the side of a character's cheek or along their jaw. It should be a smooth arc. If it's bumpy, it breaks the effect. I have optimized the current face to work well with my Cycles toon shader stack. It should work well with most other toon shaders. The extra loops in the face make this area hard to optimize. With 3D models, we are stuck with the same mesh from multiple angles. This can mean that your model works great with a certain lighting position and camera angle, but doesn't work at others. If you change the mesh to work at the second angle, the first angle breaks. The only real solution to this is to use Normal Transfer, but blender cannot currently do it very well. If you find areas with particularly wiggly toon shading, let me know and I'll see if I can improve them.
What's next?
This tool is almost good enough for my own uses, as most of the current problems I can correct in Blender, or simply have no solution at all. But I do want to make it as user friendly as possible for others. Here's what else I plan for this project. How much I do depends on people's level of interest and how busy I am at my day job.
Proxy with identical topology to base mesh but with fixed weights.
Proxy with optimized topology and weights.
Target for more body detail definition, such as collar bones, hip bones, knee caps, ankles, etc.
Some small style targets, as mentioned above.
Gender target/proxy for male characters.
Compatible eyes, teeth, and tongue.
One full character outfit (including hair and textures) to add to the MakeHuman library.
Shorter, more concise documentation than this.