A Custom Normals Workflow for Clean, Stylized Toon Shading
/Here’s the video again.
I've been working on solving the problem of making clean stylized cartoon shading, specifically for anime style faces. Anyone familiar with 3D anime from shows or games will recognize that dynamic toon shading usually looks bad, or is often avoided entirely. My goal as a 3D artist is to illustrate my own comics, so this is something that could be fixed in post production. But I got curious about why it looked bad, and if it could just be fixed in some convenient way.
One thing led to another, and now I've been down this rabbit hole for months. I've learned a bunch of GLSL, vector math, Blender's new Geometry Nodes, and the new Malt render engine. I've identified the main issues and produced several proof of concept setups that solve them. The first was Object Generated Normals, which was clean but inflexible. Now I’m on the second main setup which has more options. It is complicated, but actually looks like it could be fairly convenient to use once fully developed. I am covering it all long form in my Customizing Normals video series.
This post will be summarizing the general problems and the solutions I've found. It covers mostly the same information as Part 1 of the Series Overview video, but gets into some other things as well (and isn't nearly an hour long.) But the video does go into a lot of detail and shows many things I cannot here, so do please still watch it if you want to understand more.
The Problems
Cartoon shading is generally high contrast and hard edged. This makes it extremely sensitive to issues caused by mesh topology and vertex normal interpolation. Furthermore, most 2D toon styles these shaders are attempting to mimic will have shading drawn as if the shape was simpler and cleaner than it really is. This is especially the case on character faces, which will also receive the most scrutiny from the viewer. So I’m mostly talking about those, but the fundamentals apply to anything.
Normals and Toon Shading on a high poly bent plane with even loop spacing vs slightly uneven loop spacing. Even just that is enough to screw up toon shading due to Linear Interpolation of Vertex Normals. (Normals are shown stepped and Absolute to make them easier to see.)
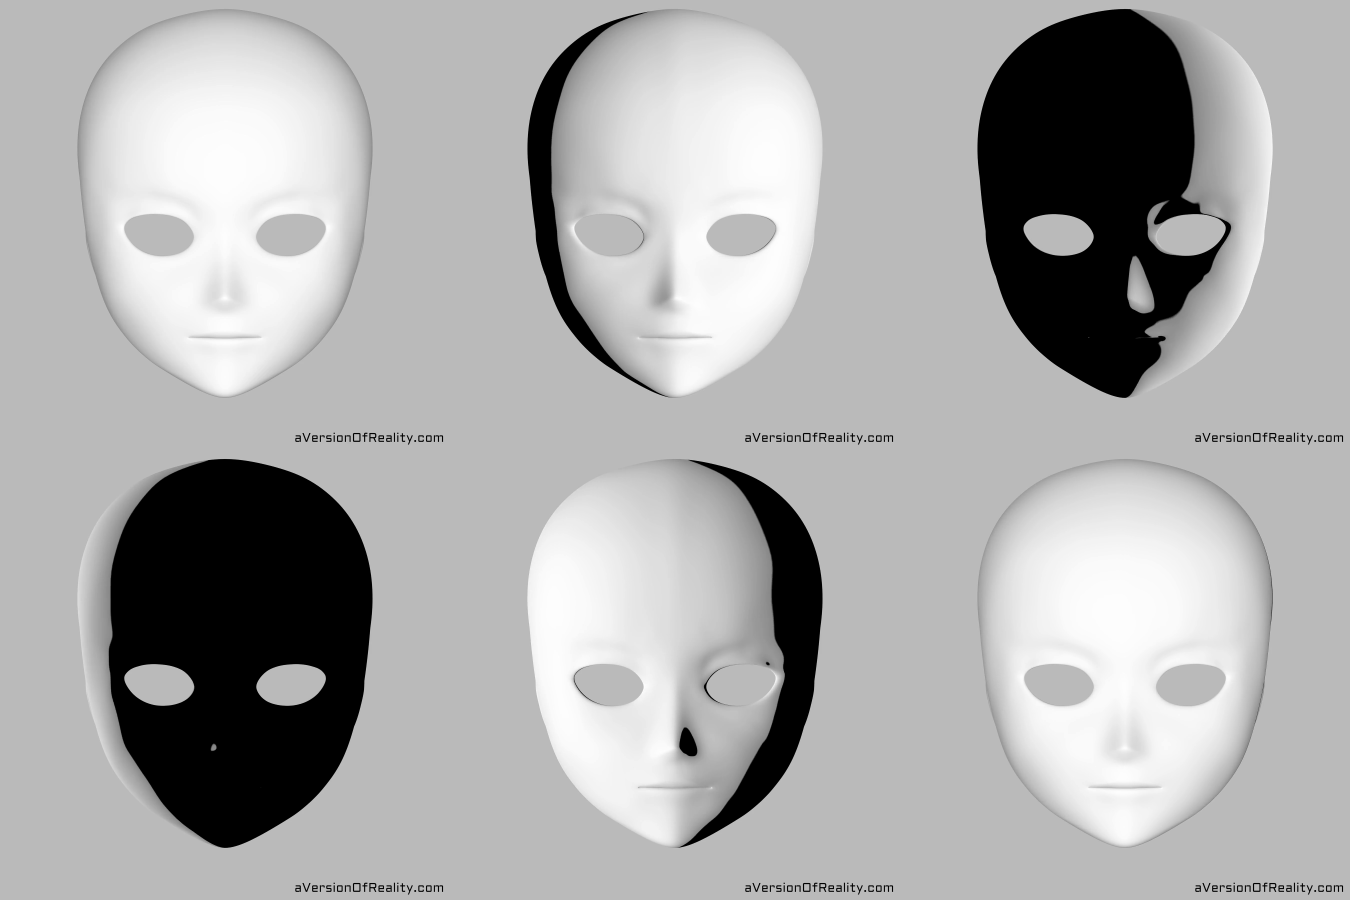
Base mesh with toon shader. Even with high subsurf, the shading is too wavy and lumpy. It just isn’t how it would be drawn. Smoothing the model more destroys the shape before it fixes the shading, and cannot solve problems caused by topology and interpolation.
People are used to very clean line art and shading shapes. If similar quality cannot be achieved, the style will always look incorrect to them. The sorts of issues caused by uneven topology or introduced by deformations are extremely visible and style breaking.
To get the style correct, several major problems must be solved:
1) How to get clean shading/Normals.
2) How to get shading/Normals different from what the base mesh's shape provides.
The standard solution is to create a mesh with clean shading in the desired shape, and then either transfer its Normals as Custom Vertex Normals (aka split Normals), or bake a Normal Map to the base mesh. However, this is easier said than done. The shape that creates the proper shading may not have the correct topology for that shading to be clean, and may be too different from the base model to get a clean transfer/bake. And the destination mesh may not have the correct topology or vertex density to even support the desired shading. This means this method is generally limited to simple shapes, and is often unreliable.
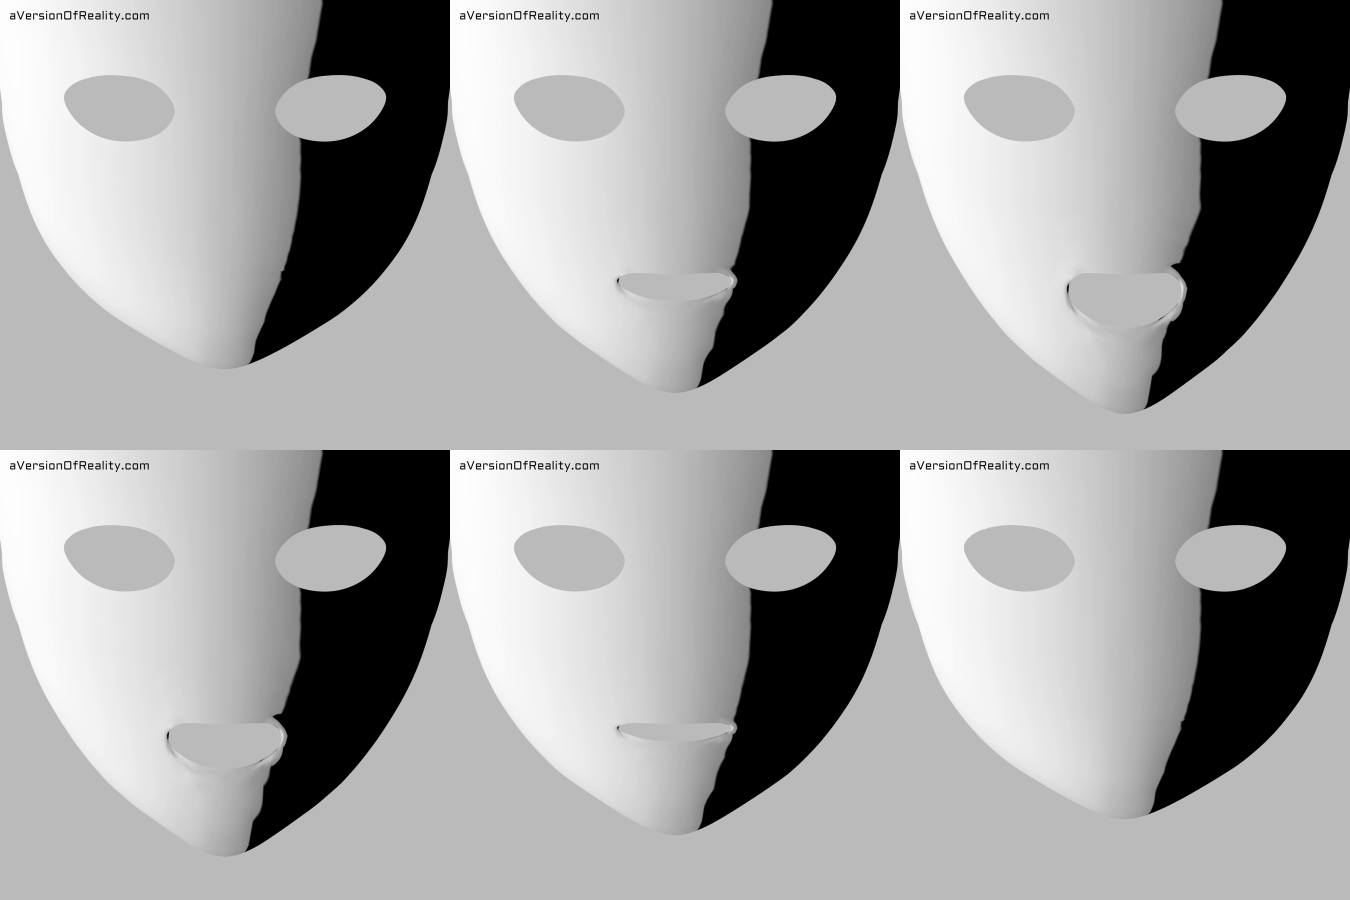
The shading edge is clean due to Custom Vertex Normals applied to the mesh, but it does not stay clean on deformation.
For a proper transfer/bake solution that gives maxiumum flexibility, we need to be able to separate issues of shape, topology, and transfer accuracy from each other.
There are various other methods that have their pros and cons, such as defining shading shapes in the topology itself or flattening Normals based on their facing to the camera. These methods can achieve good artistic results, but generally place severe limitations on style, such as only working with flat two-tone shading, or not looking good with dynamic lighting.
The larger problem is that both Custom Vertex Normals and Normal Maps are offsets on the base Normals of the mesh. Both are additional rotation applied on top of the existing angle. This means that when the base mesh deforms, they change. The purpose of either will have been to transform the base shape to a simpler, smoother shape. These deformations will cause it to no longer achieve this shape, and will usually produce dirty shading even with very small deforms. This raises our third major problem:
3) How to keep shading/Normals clean through mesh deformations.
This problem is so significant that many forgo dynamic lighting on faces entirely. It is often better to have good looking static shading (texture painted) or no shading than to have bad looking dynamic shading. We see this in areas that toon styles are commonly used, from vTubers to games.
There are also methods that fake some light, or fake the surface with a simplified mask of some sort instead of full Normals. And methods that live transfer Custom Vertex Normals from a proxy mesh with different rigging to reduce bad deforms, or even that use the un-deformed Normals on deformed meshes.
While these methods do work to some extent or another, they still generally limit style options and especially detail level. They are all attempting to fix the problem of not having clean Normals by not using them to some extent or another. If we just had clean Normals in the first place, things would be much simpler and less restricted.
The Solutions (Conceptually)
So how do we get clean Normals of any shape we want, and that don't break on deformations?
Evenly spaced quad topology produces clean shading. Anything short of this will start to have issues due to vertex normal interpolation. Toon shading requires a level of precision far higher than regular soft shading. Shapes must be extremely even and smooth.
For any specific contour or shape you may want, whether a nose or the curve of a cheek, it should be possible to model it cleanly. But you probably cannot make a single mesh with topology that can cleanly support multiple complex shapes properly. The loop flow that produces a good nose or brow curve isn't necessarily also going to work with the mouth or jaw line. And even if it does, it will be a time consuming puzzle to get it working, and probably limit your options.
The solution is to have tools that allow you to create different shapes and details separately from each other, with each having whatever topology they need, and then combine them together on a destination mesh in whatever way is most convenient. This can be done either on the mesh level or through textures in the shader. You can model a shape and transfer its Normals or bake it to a Normal Map texture. Or for some shapes, create them with a procedural textures directly in the shader.
As for the deformation problem, the core of it is that it is very difficult to stop a complex mesh from distorting in undesirable ways, especially when it comes to fine details. But it is not an issue to keep a simple shape clean through simple deformations. Technically, the problem is already being solved with the typical Normal Transfer methods as long as the transfer is live, not applied. The issue is that these methods work by obliterating all details, including things that you want.
The solution is to use this method of replacing the base mesh Normals with those from a simpler clean shape that only follows simple deformations, and then add back only the desired details on top of that.
That all sounds very nice, but how do you actually do it? I called this Conceptual because the workflow I'm describing doesn't really exist (that I'm aware of), because the tools to make it have not existed so far (that I'm aware of.) But thanks to the power and flexibility of Blender's Geometry Nodes, we can now build the tools to do everything I just described!
What Geometry Nodes Let Us Do
Geometry Nodes allow us to do several useful things we could not do before:
Store any arbitrary values as a per-element mesh data Attribute. Eg. A float, int, or vector per face/edge/vertex.
Do any math we want on Attributes (within Geonodes limits, such as not currently allowing For Loops, although you can sort of do them for some things.)
Conveniently transfer Attributes between different meshes.
Conveniently copy and transform meshes with comparatively low performance impact and clutter.
Pass any Attributes to the Shader.
These things are not technically mandatory for doing a good workflow, but they make a huge difference in getting things set up, and handling the artistic and design issues.
Here's what these mean for the workflow:
1 - Flexible Normals Combination with visual feedback:
We have total flexibility in how we process our Normals. We can do all the vector math we're used to doing in shaders such as Normal Mapping, Surface Gradients, Space Transforms, etc. This allows us to build a pipeline for assembling a complex shape by:
Getting Normals from whatever sources we want.
Transferring them to a common mesh.
Combining them in any way we want.
This solves the problem of creating a shape and getting its Normals. Model whatever you want with whatever topology it needs. Use any modeling or generation tools. Make as many separate pieces or layers as needed. Then transfer and combine them together mathematically. And we can do it with relatively quick viewport feedback (performance depends on mesh complexity, of course.)
Transferring Normals from multiple different shapes and then combining them together in World Space with Surface Gradient math.
Normals of a Sphere transferred and combined with Tangent Normal Map math. This gives the effect of the shape being wrapped onto the surface.
These are using Vertex Normals, so the quality and detail level are limited by the vertex count and interpolation issues. This is always going to be lower quality than a texture unless the mesh is very high poly, which it may be if using a non-real time workflow with lots of subdivisions. For the above examples, only two levels of subdivision surface were used for the sake of performance. But the whole issue can be bypassed by baking to a Normal Map texture and combining in the Shader instead.
The same Normal Mapped sphere, but this time its from a baked texture. Vertex density quality issues solved.
So I expect the workflow will be to use the lower detail transferred Vertex Normals as a preview while solving the artistic problems of what exactly to use for any given style or character. Even once the technical setup is complete, the flexibility and live feedback will be useful for the artistic/design process.
2 - UV Meshes:
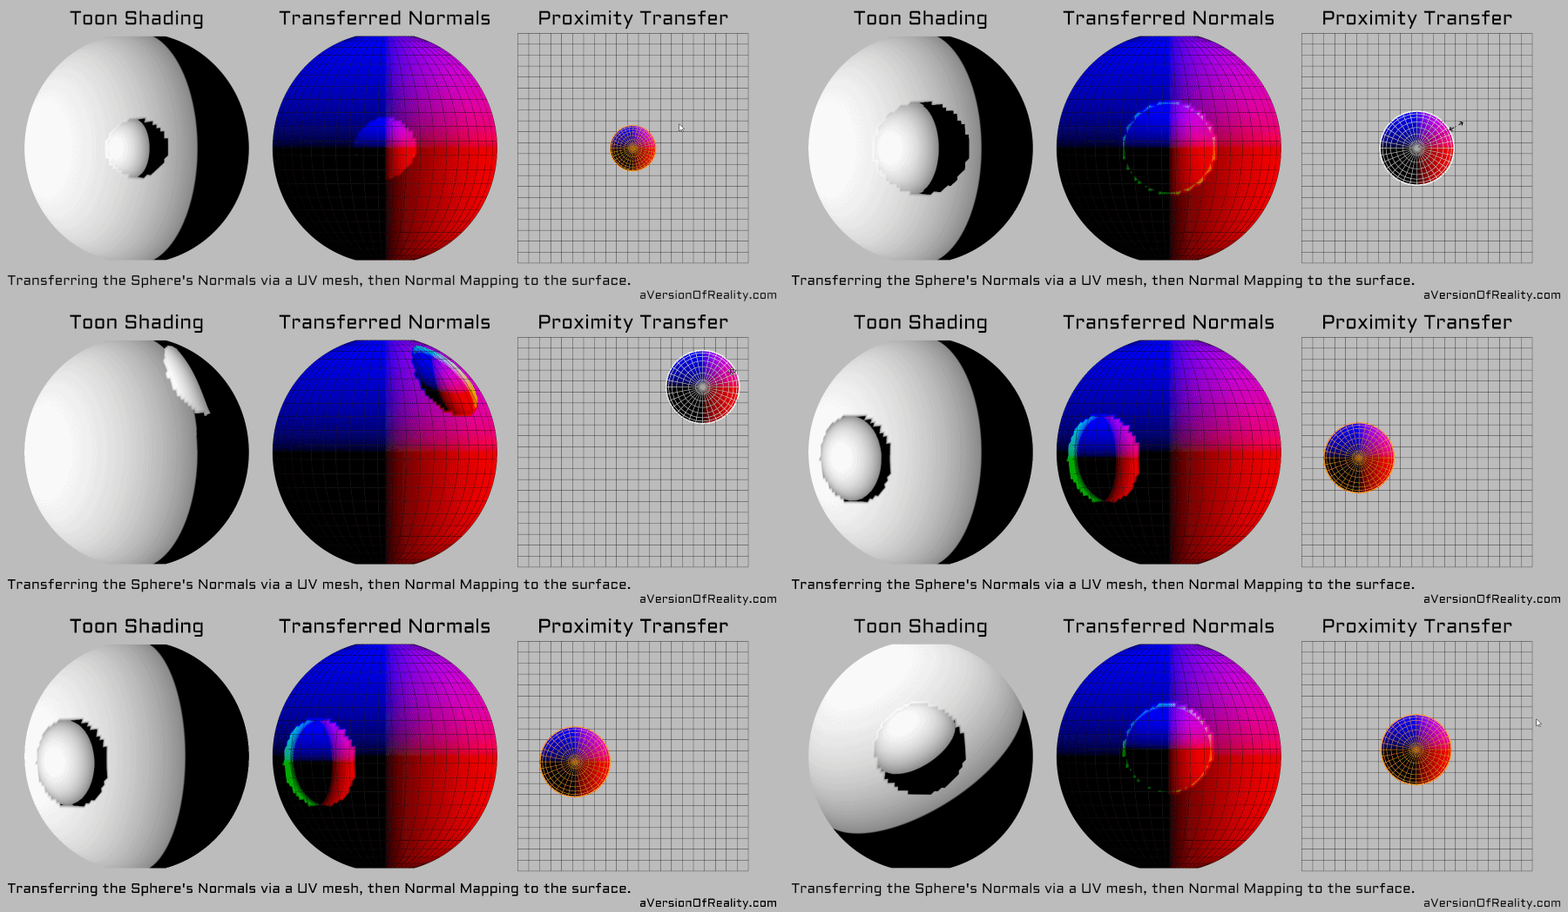
You can duplicate a mesh and set each vertex to its position in UV space. This gives a flat unwrap of the mesh that can still transfer data back to the original via Topology Transfer. Using flattened versions of both Source and Destination meshes allows for accurate and predictable Proximity Transfers. And the whole process is done behind the scenes in the Geometry Nodes node tree. The necessary UVs can easily be made by transferring them from a simple shape.
Clean, accurate proximity transfer by going through flattened duplicates of the mesh. Normals are on Absolute so we can see them and the shading.
UV meshes also simplify the baking process. Match an orthographic camera to the UV bounds, position whatever you want to bake over the target UVs, and render. The entire bake system can be bypassed. (You do of course need to do any math that is usually done by the baker yourself in the shader or GeoNodes, but that is comparatively simple.)
Forget baking! Just model what you want and take a picture of it. But beware of color transforms!
3 - Custom Tangents:
Using Normal Maps with Custom Normals can lead to accuracy issues depending on how they are made. A Normal Map baked from one mesh to another will only be accurate when applied if the Normals and UV Tangents used to apply it are the same as when it was baked. And if using Normal Mapping to apply surface detail baked to a flat plane or made procedurally, like in my examples, there will be distortion if the Normals and Tangents are not orthogonal.
For Example, if you bake a Normal Map of a Source mesh to a Destination mesh, and then apply Custom Normals to that Destination mesh, then when you use the Normal Map on it, it will be distorted. This is because the Tangent, Bitangent, and Normal are the XYZ axes used in the transformation done when the Normal Map is applied. (The Bitangent is generally calculated from the other two with cross product, so we don't worry about it specifically.)
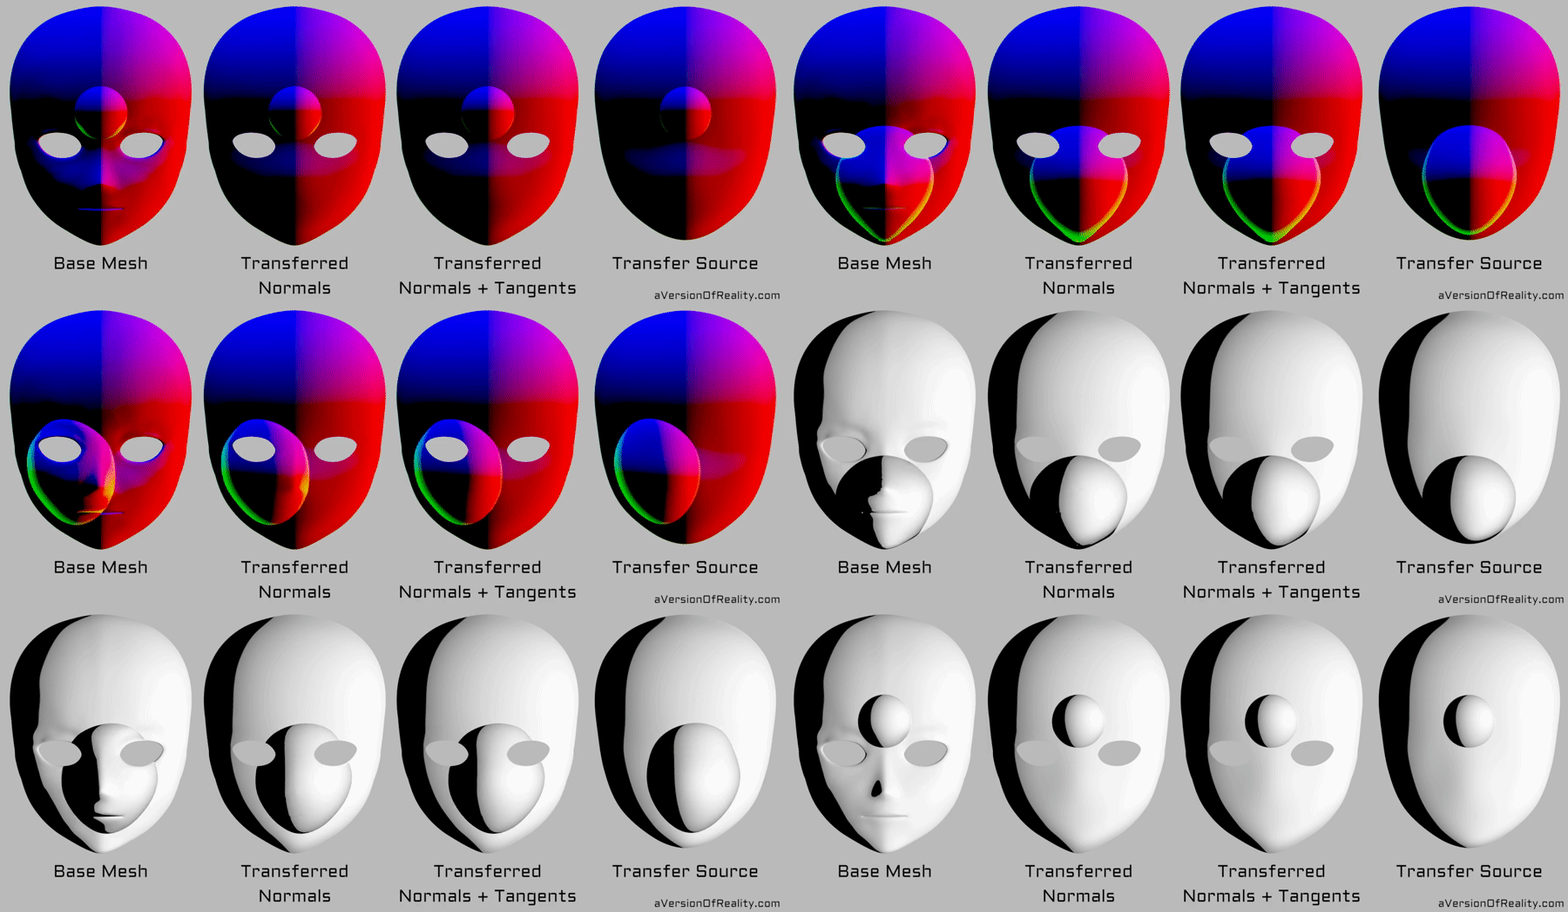
A Normal Map of a Sphere. Note the second face without transferred Tangents shows some details of the Base Mesh, but the third face matches the Source despite still being the full geometry of the Base.
The issue in Custom Normals workflows is that we want to override the base mesh with some simplified shape's Normals, and then use Normal Maps on top of them. If the Normal Map is baked off these Custom Normals, and the area it is in does not deform, then this is fine. But if it is a Normal Decal, and/or the area will deform, then Custom Tangents that match (are orthogonal to) the original shape the Custom Normal was made from are necessary to avoid distortions.
In Blender, Custom Normals override the base Normals completely in the shader nodes. But the Normal Map Node and UV Tangent Node still provide Tangents that match the base Normals and not the Custom. This is because the UV Tangents are calculated from the position of the geometry in World Space compared to its position in UV space. Normals are not a factor. There is no way available to control UV Tangent calculation or transfer them. But thanks to Geometry Nodes, we can now make our own calculation setup and then transfer the Tangents and pass them to the shader as a Generic Vector Attribute.
Hopefully Geometry Nodes will get its own proper UV Tangent node in the future, as mine are not currently Mikktspace compliant, and it will be a hassle to get them to be.
How All This Solves the Problems:
Base Mesh vs Mesh with transferred Normals and Normal Mapped nose. It isn’t perfect because the Source and Nose aren’t perfect, but note how the transferred shading matches the Source very well, and survives the deformations.
So with those tools, here's the basic structure we can use to solve our main problems:
#1: Base Mesh to define the shape. Its Normals will be overridden, so it can be modeled to prioritize rigging or performance instead of shading.
#2: Simplified smooth Source shape rigged only to major defoms like the jaw. Overrides the Normals and potentially UV Tangents and UV Map of #1. This removes all details and solves the deformation problem.
#3: Various detail Normals such as Nose, lip curve, brow ridge, eyelid crease, etc. These can be created in whatever way is most optimal. They could be modeled and their Normals transferred directly, or baked to textures, or made procedurally in the shader. The important part is that these shapes end up on #1, where they are combined with the Normals of #2. We get the details we want, and since they are dependent on the clean Normals of #2, they will not break on deformations.
#4: Depending on the style and the rest of the setup, you may need some sort of detail rigging. We solved the deformation issue by cutting the complex base mesh out of the picture, but that may mean details are not dynamic enough. For example, if you have a detail for an eyelid crease, it will probably need to change in response to complex face rigging to look correct. This can be solved as needed in many ways. Some options are:
Masking back in influence from the base mesh in needed areas.
Mixing between or masking different details with values driven by the rig. This would be like typical expression shapekey/blendshape setups (which you may also have on the base mesh). But instead of position changes, it could be changes to Vertex Normals, or even a Mask/Factor stored as a mesh Attribute and used to control textures (to avoid mesh level of detail issues.)
If using a live transfer setup, the Source mesh could be rigged directly to change into the proper shape.
How exactly you setup each of these elements is going to depend on what exactly you're making, how you're rendering it, the mesh detail level you're using, etc. The fundamental structure should work regardless of the specifics of how each element is done.
For example, my proof of concept setup above uses a Simplified Face Shape mesh generated off the Base Mesh's UV with GeoNodes (so it follows deformations but doesn't pick up small details), which then transfers Normals to the base as mesh data. The nose detail is a Normal Map texture since it is small.
Is This Blender Only? Can It Be Used In Games?
The structure I've described could potentially exist in any 3D software. I'm only aware of Blender's Geometry Nodes giving us the features we need currently, but I'm not an expert on other programs.
Solving this problem for game engines has not been my primary focus, but I know it is where most people want to go with their Non-Photorealistic art. I have been talking with people who are more on the game engine side, and it looks like it should be possible to implement in some form. Even if not fully implemented, if you are going to use Custom Normals at all, some of this will be useful for making them in the first place.
If you wanted this sort of setup in a game engine, you couldn't do live generation or proximity transfers for performance reasons. For #2, you'd either need to solve proximity transfer performance (perhaps through a pre-defined bind), or get a clean shape by some method other than transfer. Something like my previous shader based Object Generated Normals method could provide it, and already can be setup in game engines. It would need to be expanded to also have Tangents to allow Normal Mapped details to be added to it properly. And you would need to be able to create the same generated shape in Blender and in the game engine shader in order to create those Normal maps and have consistent results. That is all technically possible to build.
It will take some research and tinkering, but it should be entirely possible to create the necessary matching material setups in Blender and the game engine, as well as a set of artist friendly tools/node groups/premade setups to allow this all to be done. There should be no conflict with other parts of a character production pipeline. The base mesh would need to be brought into Blender, but the output of this process would be Normal Maps and/or vertex data that are program agnostic.
What Next?
So how does this all go together into something we can actually use? What is optimal for performance? What is most convenient? What shapes do we need? What setup achieves X style? These are questions I am still trying to answer. The focus so far has been on figuring out the overall structure to solve our main issues, and now the focus is on documenting and explaining what I've found so that more people can be involved in answering all the other questions.
The challenge is that we are trying to build some shapes that, when transferred to our mesh and combined, achieve a certain look and style and hold up at different light and camera angles. I don't really know what these are yet, especially for complex styles. But luckily we only need to figure out the general shapes we need one time. Once we know them it will be easy to reuse the setup for similar styles, or make small changes for different characters. The whole thing can probably be turned into a Node Group or Addon with convenient parameters.
So I don't have all the answers yet, especially to the artistic questions. Making it work and making it look good are different things. But we've got the framework to find the answers. This is why I've focused so much on flexibility of the tools and being able to get visual feedback in the viewport. It is going to take some tinkering! It may be hard to get good artistic results the first time, but once we do, then we can make it available to everyone.
I'm covering all the theory and how to build and use all these things in my Customizing Normals series so check that out!
Also, you can support me on Patreon so I can keep working on this. Thanks!


