Project Maiko: Adding and Adjusting Outfit Weights
/This is part 3 of the Project Maiko guide to outfit topology and vertex weights.
Part 1: Creating the Base Bodysuit
Part 2: Understanding Outfit Details and Weights
The previous posts focused on constructing good topology. Now we will reap the rewards and get our outfit moving with the body.
This post shows a step-by-step workflow for copying vertex weights from a body to its clothing, and then adjusting them to work properly. This is not about how to use Weight Paint mode or it's tools, it is about what to do with those tools to get good results. It assumes you have basic knowledge of Blender 2.69's tools and interface, a rigged body to work with (I'm using one from MakeHuman), and some sort of close-fitting outfit. Working off an already rigged body is a good way to learn, but if you have no experience with Weight Painting or Rigging, look up basic tutorials first.
Things to keep in mind

Since the knee joint's bones only rotate around one axis (allowing forward and backward motion), the vertices at the knee can only move in those same directions. You could not get them to move towards or away from the camera without expanding your rigging.
You should be using an Armature Modifier with Vertex Groups checked to attach your character to your rig, not the older parenting method.
Vertex weights transfer movement from the rotation of bones to vertices in groups associated with those bones. This means that no amount of weight adjustments will allow you to get your vertices to move in any directions other than what the bones provide. Always work to understand exactly which ways your bones can move in any given area before making adjustments, or you will waste time trying to paint your vertices to deform in ways they cannot. Advanced rigs often involve correctional or tweak bones, which can pull vertices in new directions. Clothing rigs or Shape Keys and Drivers can also be used, but those are all more advanced options.
Vertex weights alone cannot produce entirely realistic cloth movements, such as a sleeve pulling back from the wrist when you bend your elbow, bunching, or folding. They move vertices only, which means faces will change size in deforming areas. This will stretch your outfit (and it's textures) at those points, and not in a realistic way. If you are going for precise realism, you will again need more advanced rigging and/or cloth simulation.
If your body has features such as corrective shapekeys, these will not have been copied to your clothing, and so you may need to make your own.
Setting up the weights
1: Check your mirroring
If your mesh is symmetrical, you will want to take advantage of the X mirror option when weight painting. Apply your mirror modifier before copying any weight groups. If you applied it earlier and changed anything on your mesh, be sure to check that your sides are still mirroring properly. Do this by selecting them and then mirroring the selection. If it fails to mirror anything, then figure out what areas are not symmetrical and fix them before continuing.
2: Copy Weights from body
Put the clothing and the body into Weight Paint mode. Select the body, then shift-select the clothing second. Use the Transfer Weights tool, and transfer all groups to the nearest face.
3: Make rigid areas rigid
Any areas that are not supposed to deform need to have weights from only a single bone. If they have weights from no bones, then they will be left behind when moving any bone further up the hierarchy. Either delete the area from all but the desired bone's group, or set the strength of the other groups to zero. The actual weight on the area does not matter, as long as it only has weights from one bone on it.

The foot bone's vertex group has weight on the boot's front plates, which causes them to stretch. Once the foot's weight is removed from the front plates, they stay rigid.
4: Make weights consistent on loops that must stay parallel
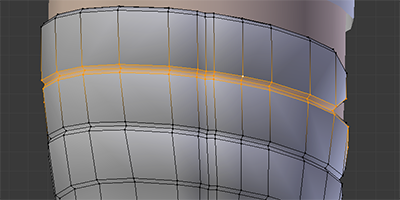
To maintain the shape of the horizontal ridge, each vertex of the selected loops must have the same weights as those directly above or below them. The weights can be different for those to the side. This will allow the ridges to stretch horizontally, but not stretch apart vertically.
If you have a seam, ridges, or other such details that need to not stretch apart, then your weights in that area must be the same on the relevant loops. Note that this can cause those areas to be rigid, which can require further adjustments.
5: Relax areas with acute angles
Areas like the groin or armpit that need to fold in will usually have clipping issues. This is due to copying the weights from the body onto a larger object. Reducing the weights of one of the involved bones usually solves the problem. Slightly enlarging the mesh can also help.

The shorts clip themselves in the groin when moving the leg in. Slightly reducing the weights of both the hip and thigh bones removes the problem. If too much is removed, it could cause problems when extending the leg outwards.
6: Delete empty vertex groups
If there are areas that the outfit does not cover, or if your outfit is several separate objects, you will have empty vertex groups. Differences in topology between the body and clothing meshes can also cause groups to contain many vertices with no weight on them. It doesn't really hurt to leave these, but they do clutter the file.
7: Set up Mask Modifier
Create a vertex group to mask areas of the body that are covered by clothing. This lets you get away with small amounts of clipping. Problems that cause severe clipping should still be addressed. Be sure to disable the mask modifier when making adjustments.
8: Test each movement
Move each limb to its maximum expected angle in each direction and check for problems. Do this with and without Subsurf turned on. Subsurf will smooth out areas of minor jaggedness, but can cause lumpiness (be sure your Subsurf modifier is after your Armature modifier). Take note of areas that need further adjustments.

The crease at the back of the knee isn't deforming perfectly, but two levels of Subsurf solve most issues. Further adjustments should not be necessary unless using an extreme pose, a close up camera angle, or if there are Freestyle problems later.
Adjusting and Troubleshooting
1: Identify all bones and vertex groups involved with the area that is incorrectly deforming.
2: Remove any vertices or groups that should not affect the area.
3: Move the limb to the maximum expected angle of whichever pose is causing the problem.
4: Change the weights by a large value to easily see which direction each involved bone is pulling the vertices. Once you understand what is going on, revert to a save or undo.
5: Add or remove weights in very small amounts as needed to get your mesh into the desired position without causing distortions.
6: Check other possible poses of the same limb to make sure your changes have not created new problems.
You will run into situations where no combination of weight adjustments will get your mesh to deform the way you want, or where fixing deformations at one angle will always break another. In these cases, try adding or removing loops or changing the base topology.
Sometimes, problems in the clothing will actually be due to problems with the weights in the body that you copied from. If you are having a major problem, check the deformation of your body for errors in that area.
If neither changing the topology or the body beneath solves your problem, then you will probably need something more than vertex weights to get the deformation you want.
Conclusion
This series has summed up my current knowledge on rigging outfits. It was enough to get Maiko's outfits working, but there is a lot more to learn. I hope to write on more advanced methods in the future. For now, I welcome any questions, requests for help, or advice on how to get better results. Feel free to leave a comment here, or message me on Facebook.